Shopifyカスタマイズの最新情報は「10ca」にて紹介しております。
【Shopify】メタフィールドを使って商品ページにカラースウォッチの色選択を実装
Shopifyがオンラインストア2.0にアップデートして、最も嬉しかったのがメタフィールドの実装。
現在はまだ「商品」と「バリエーション」しか使えませんが、いずれは「コレクション」や「顧客」「注文」のメタフィールドも操作できるようになるようで、楽しみで仕方ありません。
今回は、タイトルにもあるようにそのメタフィールドを使って、商品ページの色選択を「カラースウォッチ(色見本)」にカスタマイズする方法をご紹介します。
「カラースウォッチ」に関しては、テーマに実装されている場合も多いのですが、Dawnをはじめとする無料テーマなど非実装のテーマに実装するにはアプリを使った方法が一般的です。
また、カラースウォッチが実装されているテーマを見てみると、カラー名から判別し「background-color: black;」のようにスタイルを定義する仕組みなのですが、日本語表記など判別できない色は自ら定義する必要があったり、画像をAssetに登録したりというものがほとんどで、どちらかといえば玄人向けの機能でした。
しかしメタフィールド機能を使えば、バリエーション編集画面のカラーピッカーで登録できるので、管理も容易になります。
さて、本題です。
今回もDawnをベースにご紹介していきます。
1.バリエーションメタフィールドを設定
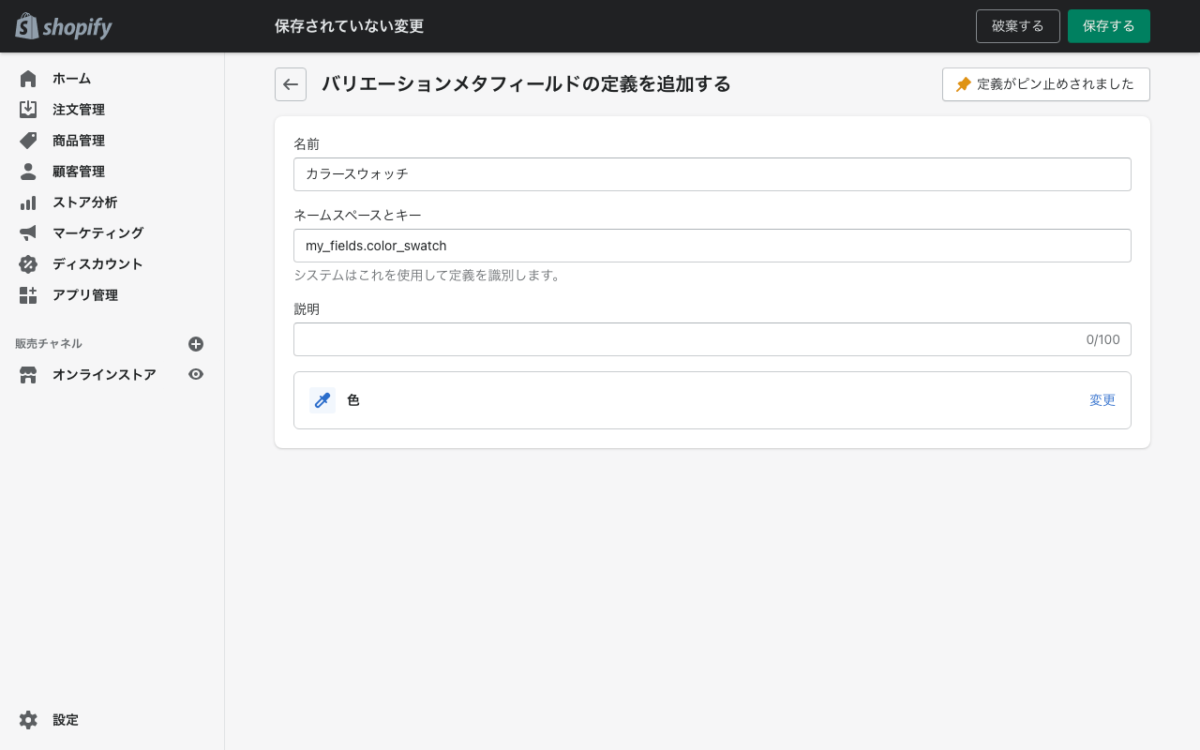
設定→メタフィールド→バリエーションの「定義を追加する」より、バリエーションメタフィールドの定義を追加し、「名前」と「ネームスペースとキー」を入力、「コンテンツタイプを選択する」にて「色」を選択し保存してください。

2. ブロック設定を編集
テーマ編集より、main-product.liquidの{% schema %}内にある「variant_picker」部分に、以下のハイライト部分を追記します。
{
  "type": "variant_picker",
  "name": "t:sections.main-product.blocks.variant_picker.name",
  "limit": 1,
  "settings": [
    {
      "type": "select",
      "id": "picker_type",
      "options": [
        {
          "value": "dropdown",
          "label": "t:sections.main-product.blocks.variant_picker.settings.picker_type.options__1.label"
        },
        {
          "value": "button",
          "label": "t:sections.main-product.blocks.variant_picker.settings.picker_type.options__2.label"
        },
		{
          "value": "colorswatch",
          "label": "カラースウォッチ"
        }
      ],
      "default": "button",
      "label": "t:sections.main-product.blocks.variant_picker.settings.picker_type.label"
    }
  ]
},
これでカスタマイザーにてバリエーションピッカーのタイプ選択で「カラースウォッチ」を選べるようになりました。
3. liquidコードを編集
同じくmain-product.liquidにある{%- if block.settings.picker_type == 'button' -%}の部分をコピーし、そのすぐ下にペーストします。
{%- if block.settings.picker_type == 'button' -%}
<variant-radios class="no-js-hidden" data-section="{{ section.id }}" data-url="{{ product.url }}" {{ block.shopify_attributes }}>
{%- for option in product.options_with_values -%}
<fieldset class="js product-form__input">
<legend class="form__label">{{ option.name }}</legend>
{%- for value in option.values -%}
<input type="radio" id="{{ section.id }}-{{ option.name }}-{{ forloop.index0 }}"
name="{{ option.name }}"
value="{{ value | escape }}"
form="product-form-{{ section.id }}"
{% if option.selected_value == value %}checked{% endif %}
>
<label for="{{ section.id }}-{{ option.name }}-{{ forloop.index0 }}">
{{ value }}
</label>
{%- endfor -%}
</fieldset>
{%- endfor -%}
<script type="application/json">
{{ product.variants | json }}
</script>
</variant-radios>
コピペしたら、2つめの{%- if block.settings.picker_type == 'button' -%}を{%- elsif block.settings.picker_type == 'colorswatch' -%}に編集します。
{%- if block.settings.picker_type == 'button' -%}
	<variant-radios class="no-js-hidden" data-section="{{ section.id }}" data-url="{{ product.url }}" {{ block.shopify_attributes }}>
	  {%- for option in product.options_with_values -%}
	      <fieldset class="js product-form__input">
	        <legend class="form__label">{{ option.name }}</legend>
	        {%- for value in option.values -%}
	          <input type="radio" id="{{ section.id }}-{{ option.name }}-{{ forloop.index0 }}"
	                name="{{ option.name }}"
	                value="{{ value | escape }}"
	                form="product-form-{{ section.id }}"
	                {% if option.selected_value == value %}checked{% endif %}
	          >
	          <label for="{{ section.id }}-{{ option.name }}-{{ forloop.index0 }}">
	            {{ value }}
	          </label>
	        {%- endfor -%}
	      </fieldset>
	  {%- endfor -%}
	  <script type="application/json">
	    {{ product.variants | json }}
	  </script>
	</variant-radios>
{%- elsif block.settings.picker_type == 'colorswatch' -%}
	<variant-radios class="no-js-hidden" data-section="{{ section.id }}" data-url="{{ product.url }}" {{ block.shopify_attributes }}>
	  {%- for option in product.options_with_values -%}
	      <fieldset class="js product-form__input">
	        <legend class="form__label">{{ option.name }}</legend>
	        {%- for value in option.values -%}
	          <input type="radio" id="{{ section.id }}-{{ option.name }}-{{ forloop.index0 }}"
	                name="{{ option.name }}"
	                value="{{ value | escape }}"
	                form="product-form-{{ section.id }}"
	                {% if option.selected_value == value %}checked{% endif %}
	          >
	          <label for="{{ section.id }}-{{ option.name }}-{{ forloop.index0 }}">
	            {{ value }}
	          </label>
	        {%- endfor -%}
	      </fieldset>
	  {%- endfor -%}
	  <script type="application/json">
	    {{ product.variants | json }}
	  </script>
	</variant-radios>
これで、カラースウォッチの実装準備が整いました。
4. バリエーションメタフィールドを実装
3でコピペしたliquidコードの以下ハイライト部分を編集します。
{%- elsif block.settings.picker_type == 'colorswatch' -%}
	{{ 'colorswatch.css' | asset_url | stylesheet_tag }}
	{%- assign color = 'カラー' -%}
	<variant-radios class="no-js-hidden" data-section="{{ section.id }}" data-url="{{ product.url }}" {{ block.shopify_attributes }}>
	  {%- for option in product.options_with_values -%}
	      <fieldset class="js product-form__input{% if option.name == color %} colorswatch{% endif %}">
	        <legend class="form__label">{{ option.name }}</legend>
	        {%- for value in option.values -%}
	          <input type="radio" id="{{ section.id }}-{{ option.name }}-{{ forloop.index0 }}"
	                name="{{ option.name }}"
	                value="{{ value | escape }}"
	                form="product-form-{{ section.id }}"
	                {% if option.selected_value == value %}checked{% endif %}
	          >
	          {%- capture variant_color -%}
	              {%- for variant in product.variants -%}
		              {%- if variant.title contains value -%}
		                	{{ variant.metafields.my_fields.color_swatch }}
		              {%- endif -%}
	              {%- endfor -%}
	          {%- endcapture %}
	          {%- assign vc = variant_color | split: ' ' | first -%}
	          <label for="{{ section.id }}-{{ option.name }}-{{ forloop.index0 }}"{% if option.name == color %} style="background-color: {{ vc }};" aria-label="{{ value }}"{% endif %}>
	            {% unless option.name == color %}{{ value }}{% endunless %}
	          </label>
	        {%- endfor -%}
	      </fieldset>
	  {%- endfor -%}
	  <script type="application/json">
	    {{ product.variants | json }}
	  </script>
	</variant-radios>
上から順に説明します。
まず2行目で、カラースウォッチ用のスタイルシートを読み込みます。
{{ 'colorswatch.css' | asset_url | stylesheet_tag }}
こちらについては、後ほど説明いたします。
続いて3行目にて、バリエーションのオプション名を定義します。
{%- assign color = 'カラー' -%}
今回は「カラー」で設定してありますが、「Color」や「色」の場合はその様に編集してください。
次に6行目の<fieldset>タグのクラス部分に以下を追記します。
{% if option.name contains color %} colorswatch{% endif %}
先程定義したオプション名だった場合は「colorswatch」というクラスが付与されるようになっています。
15〜22行目にてバリエーションメタフィールドを出力する準備をします。
{%- capture variant_color -%}
 {%- for variant in product.variants -%}
  {%- if variant.title contains value -%}
   {{ variant.metafields.my_fields.color_swatch }}
  {%- endif -%}
 {%- endfor -%}
{%- endcapture -%}
{% assign vc = variant_color | split: ' ' | first %}
何故こんなに複雑になるかというと、バリエーションメタフィールドはforループでしか出力できなくて、そのまま出力しても全バリエーションのカラー値が出力されてしまうからです。
例えば3サイズ3カラーの場合は、「#ffffff#111111#777777#ffffff#111111#777777#ffffff#111111#777777」って感じに出力されちゃいます。
それを回避して各カラーに紐づくメタフィールドを出力させる為に、上記の仕組みを考えました。
もっと便利な方法があれば教えていただけると嬉しいです。
まず{% capture %}にてバリエーションのforループを設け、オプション名(カラー)を含んだバリエーションのみを選定、そのメタフィールドのカラー値を出力させます。
ただこれだと3サイズ3カラーの場合は、Whiteの出力結果が「#ffffff#ffffff#ffffff」となってしまうので、最後の{% assign %}にて1つにし、{{ vc }}で出力されるようにしてあります。
uniqでも実装可能なんですが、uniqの場合はカラー値が混在していた場合にまとめられないので、最初の値だけ抜き出すfirstを採用しました。
ちなみにlastでもOKです。
23行目の<label>タグにて先程定義したカラー値を反映させます。
{% if option.name == color %} style="background-color: {{ vc }};" aria-label="{{ value }}"{% endif %}
オプション名が「カラー」だった場合のみにスタイルが適用されるので「サイズ」とかには反映されません。
また、カラー名のテキストを消すのでアクセシビリティの為にaria-label属性にてカラー名を定義します。
最後に24行目の{% unless %}にて、オプションが「カラー」以外はバリエーション名が出力されるようになっています。
{% unless option.name == color %}{{ value }}{% endunless %}
分岐してカラーの場合はスクリーンリーダーテキストにするのもありですね。
5. スタイルシートを作成
「新しいassetを追加する」より「colorswatch.css」を作成し、以下のCSSを貼り付けます。
.product-form__input.colorswatch input[type=radio]+label {
	width: 4rem;
	height: 4rem;
}
.product-form__input.colorswatch input[type=radio]:checked+label {
	box-shadow: 0 0 0 2px #fff, 0 0 0 3px #333;
}
元のCSSを活かしつつ極力シンプルにしているので、お好みでデザインしてください。
6. 商品のバリエーションをでカラーを設定
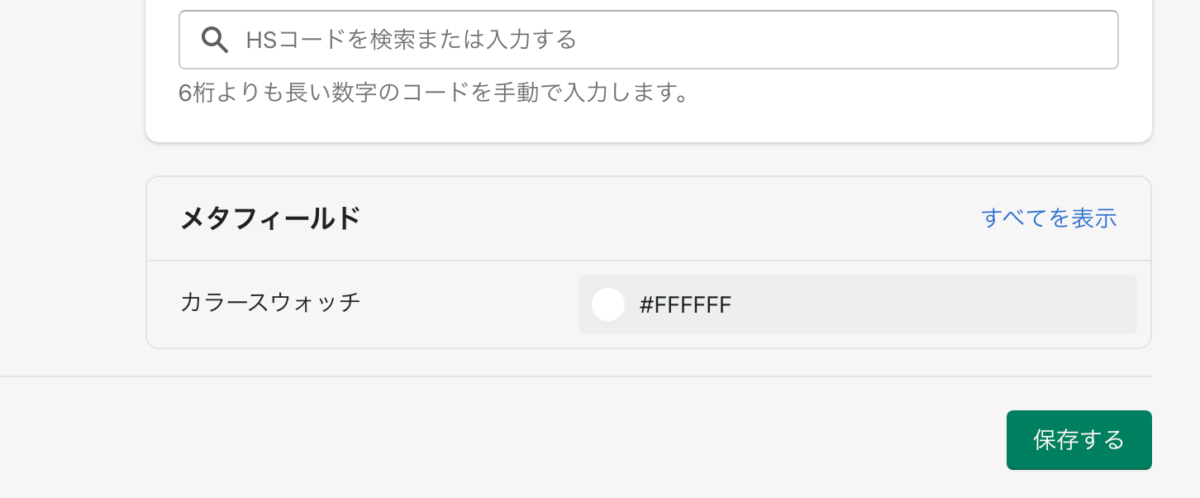
商品管理より各商品のバリエーション編集にて、最下部にメタフィールド編集のブロックがありますので、全バリエーションのカラー値を設定します。
商品数やバリエーション数が多い場合は、CSVで編集すると効率が良いです。

カラー値はグレーの場合は全て#777777、ブラックの場合は#111111に統一するなど、予めバリエーション用に決めておくと便利です。
7. カスタマイザーを設定
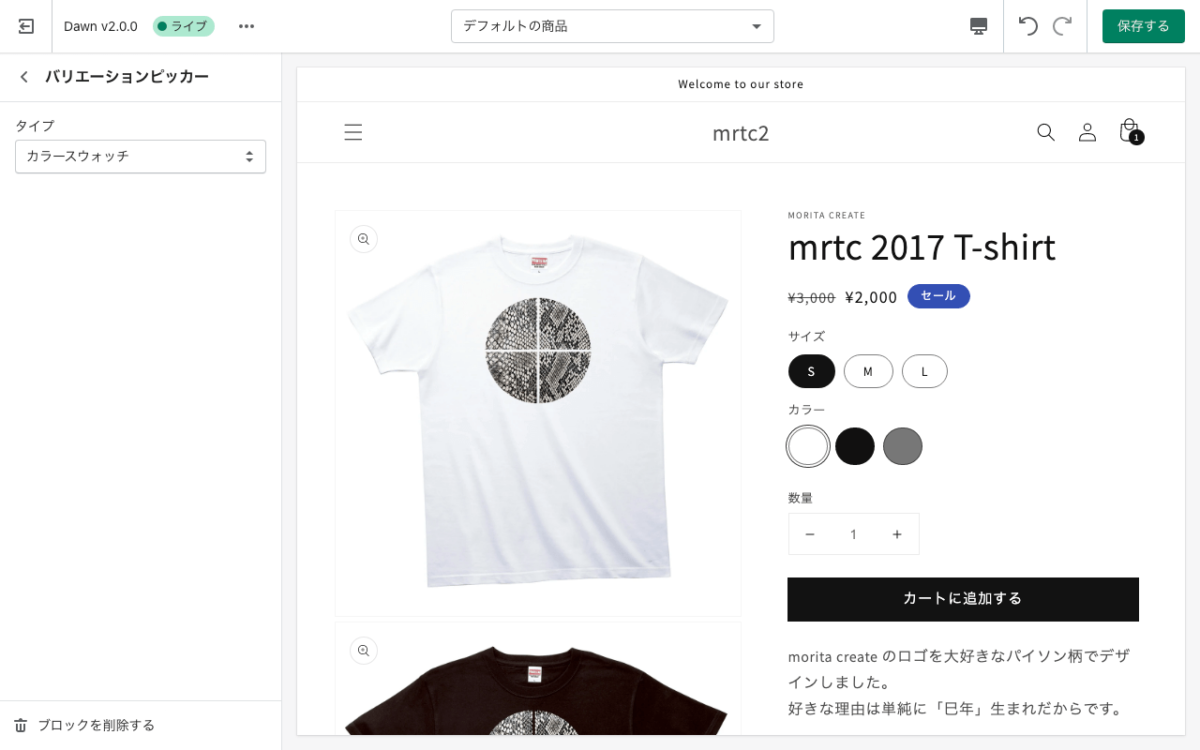
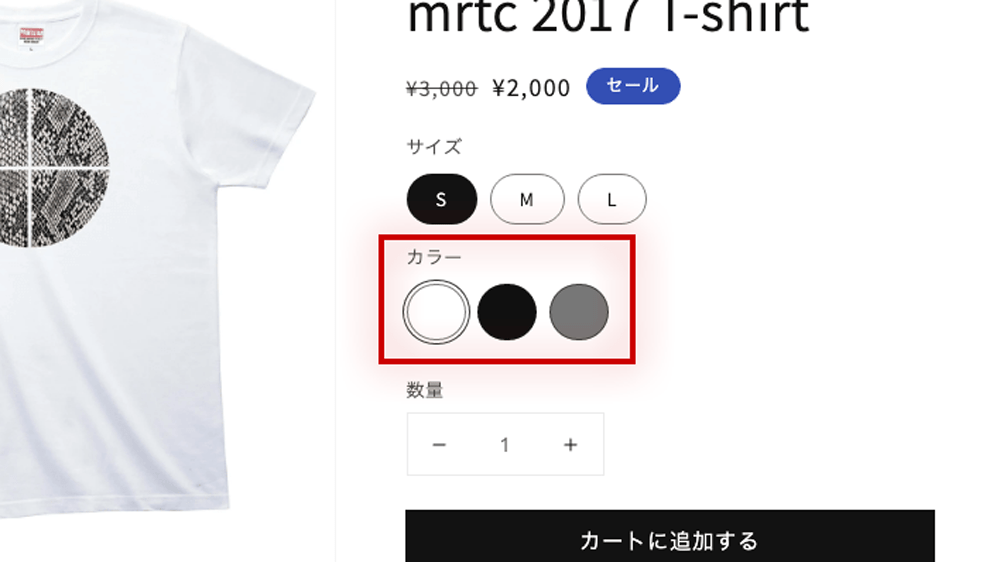
最後にカスタマイザーにて商品ページの編集画面を開き、商品情報のバリエーションピッカーを選択、タイプを「カラースウォッチ」に、保存すればオプションのカラー部分のみがカラースウォッチに切り替わります。

以上で実装は完了となります。
Ex. さらに拡張してみる
カラースウォッチにカラー名も表示させたい場合は、オンマウスでバルーン(吹き出し)表示なんてのもいいですね。
その際はcolorswatch.cssに以下のスタイルを追記すればバルーンを実装できます。
.product-form__input.colorswatch input[type=radio]+label::before,
.product-form__input.colorswatch input[type=radio]+label::after {
	position: absolute;
	display: inline-block;
	left: 50%;
	font-size: 10px;
	line-height: 1;
	transform: translateX(-50%);
	transition: .2s linear;
	opacity: 0;
	z-index: -1;
}
.product-form__input.colorswatch input[type=radio]+label::before {
	content: attr(aria-label);
	top: -2em;
	color: #fff;
	background: #000;
	padding: .5em;
	border-radius: 3px;
}
.product-form__input.colorswatch input[type=radio]+label::after {
	content: "";
	top: 0;
	border: .5em solid transparent;
	border-top-color: #000;
	border-bottom-width: 0;
}
.product-form__input.colorswatch input[type=radio]+label:hover::before,
.product-form__input.colorswatch input[type=radio]+label:hover::after {
	opacity: 1;
	z-index: 1;
}
.product-form__input.colorswatch input[type=radio]+label:hover::before {
	top: -3em;
}
.product-form__input.colorswatch input[type=radio]+label:hover::after {
	top: -1em;
}
一昔前はjQueryUIとかで実装してましたが、便利なCSSも増えてきたのでCSSだけでアニメーションのついたバルーンが実装できます。
Dawnをはじめ新しいテーマは軽量化のためにjQueryを使っていない事が多いので、こんなことの為に重たいjQueryやjQueryUIを実装する必要はありません。
他にもメタフィールドのコンテンツタイプをファイルにすれば、サムネイルにしたりすることもできますね。
以上、商品ページの色選択をメタフィールドを使ってカラースウォッチを実装する方法でした〜
